Showing posts with label paint. Show all posts

Wednesday, January 26, 2022

Crafty Canvases - Easy DIY Art


Here's an easy way to make art with canvases... no artistic skill required! You can have the art say whatever you want, and you can size it to suit your needs. You will need:

Canvases. Inexpensive canvases in various sizes are available at Michael's, other arts and crafts stores, and even Dollar Tree. I used six 10" x 10" canvases to cover a large wall area of six feet.


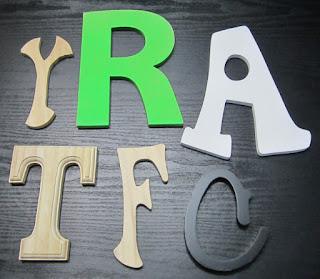
Letters. Now that decorating with letters is no longer a trend, people are donating letters to thrift stores, and craft stores are putting letters on clearance sales. Smaller posterboard letters are also available, or you can cut letters from scrapbook paper. I purchased wood and chipboard letters at thrift stores and at JoAnn for about $1 each.


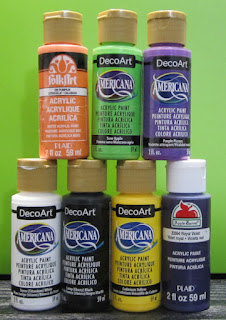
Acrylic craft paints. I used Halloween colors because I planned to hang the canvases in my Halloween theme workroom.


Decorative items to add to the canvases and/or letters. I used wood shapes, adhesive gems, scrapbook paper, and stickers.

Ribbon for hanging the canvases.


You'll also need thumbtacks and basic craft supplies such as scissors, paint brushes, and glue.

To begin, paint your canvases. Don't forget to paint the sides! I painted four canvases in solid colors, one in two shades of purple, and one in candy corn colors (using painter's tape to make straight lines).


Paint, decoupage, or otherwise decorate your letters. I painted most of my letters a solid color. I decoupaged scrapbook paper onto the "R."

When all the paint is dry, glue the letters to the canvases and add other decoration. (If you have a heavy letter, such as my chipboard "R," you may want to hang it in front of the canvas instead of trying to glue it directly to the canvas.) My decorations included painted wood shapes, ribbon, 3D stickers of bats and a spooky tree, and polka dots painted with round sponge spouncers.

Add ribbon for hanging the canvases. If you will be hanging them on a bar like I did, use a loop of ribbon from the back to the front on the canvas. To hang directly on the wall, attach the ribbon from side to side. Secure ribbon with thumbtacks pressed into the wood frame of the canvas. 


Hang your completed canvases. I used a curtain rod hung on decorative hooks.


Feel crafty! :D


Thursday, May 28, 2020

More Repurposed Kitchen Cabinets

More repurposed kitchen cabinets! I used wall cabinets this time. Floor cabinets would have been too tall and too deep for the space. The shorter and shallower wall cabinets fit perfectly under the window on either side of the floor vent.

I painted the cabinets in black and Halloweeny lime green. At first, I thought the green was too loud and intense.

But filling the cabinets with cans, jars, and painting supplies obscured the color a bit. Now it's calling out rather than shrieking. :)

Two lessons learned from this project:
1. Wall cabinets need not be hung on a wall.
2. A color (or pattern) that seems too intense when the cabinet is empty may be just right when the cabinet is full.

Wednesday, April 29, 2020

Repurposed Kitchen Cabinets

Two of my old kitchen cabinets have been repurposed in my workroom.

Just for fun, I painted them in a Halloween-inspired palette of black, orange, purple and green.


I added drawer liners made from a vinyl tablecloth.


Wednesday, April 15, 2020

DIY Shelf from a Repurposed Drawer


After treating myself to new kitchen cabinets, I am repurposing the old cabinets. They're poor quality and quite worn, but most of them are serviceable for my workroom and garage. More on that later. :)

One base cabinet was in such bad shape that it essentially fell apart when I moved it. (I can't believe it managed to support the weight of a countertop for 45 years!) The drawer was the only salvageable part.

I decided to turn it into a shelf to store my craft paints. After measuring the paints and the drawer, I determined how far apart to space the individual shelves.

I made shelf supports with small slices of 1x3 boards and attached them with my power nailer. I placed 1x3 boards on the supports to create the shelves.

After primer and green paint, I added black and white striped wrapping paper and topped the shelves with black and white striped washi tape.

The end result is storage perfectly sized for my craft paints and other small supplies.


Friday, May 5, 2017

Stairwell Redo Version 2

A few years ago, I redid my basement stairwell. I removed the carpet from the stairs and painted everything in a lilac and black color scheme.

On the risers, I used black and white adhesive shelf paper.

I liked the result... until I didn't really like it anymore. After a while, I just wasn't feeling the lilac. So I repainted the stairwell in the same grey, black and white color scheme as most of my house.

I used a black and white scroll print paper on the risers.

To complete the set of comparison pictures, the photobombing by Miniature Pinscher version 1 was reenacted by Miniature Pinscher version 2. ;)

Wednesday, March 29, 2017

Craft Along with GIY: Rhymes with "That"


The theme for this month's Craft Along with GIY is Rhymes with "That". For my project, I painted and stenciled my standing mirror with gloss over matte.

The mirror came from a thrift store and was plain brown.

I primed it and painted it matte black.

Then I stenciled it with gloss black. It looks prettier now, and it matches my stenciled dresser and chest of drawers.


I look forward to seeing what you all came up with for the Rhymes with "That" theme. :D

To share your Craft Along with GIY project:
1.  Add the Craft Along with GIY icon to your blog post. Link the icon to this page:
http://gothityourself.blogspot.com/p/craft-along-with-giy.html
2.  Leave a comment with a link to your project. If you're not a blogger, you can link to your webpage, Instagram, or anywhere else readers can see it. (Please link directly to the project page.)

On March 31, I will compile the links on the Craft Along with GIY page.

Sunday, October 23, 2016

Laundry Closet: DIY Shelves

My laundry closet is one of the more… uh… interesting improvements made by the previous homeowners. It was created by cutting a large doorway into the hall wall and taking space from an already small bedroom. While having the laundry on the main floor (rather than in the basement) is very convenient, what's left of the bedroom is an awkward L-shape and only six feet (about 2 meters) wide.

The laundry closet is behind the large set of bi-fold doors on the right side of the hall.

Apologies in advance that some of the makeover pictures are a little awkward. With the narrow hall, it's impossible to get pictures of the closet from a distance.

The laundry closet was functional but not at all attractive - dreary beige walls, white laminate shelves, and a sad little fluorescent light. It needed a makeover!


I began the makeover by taking the shelves off the walls. I discovered they had been hung with toggle bolts. Ugh. Removing toggle bolts is the stuff of homeowner nightmares.
The fundamental problem is that removing a toggle bolt requires contradictory motions. To turn the screw, you have to push on it with a screwdriver… but at the same time, you have to pull on the screw because otherwise, the toggle is just merrily spinning around and around, mocking you from inside the wall.

With the perfect combination of tools, technique, perseverance, and luck, you might be able to accomplish the simultaneous pushing and pulling, remove the screw, and be rewarded with the sound of the toggle falling down inside the wall.

If you can’t get the tools, technique, perseverance and luck just right, you will not be able to remove the screw. You then have the pleasure of using more tools to decapitate the screw and hammer it and the toggle into abyss behind the wall.

After this epic struggle, you are left with a large hole in your wall.

Or in my case, several large holes. On a textured wall which makes holes difficult to patch. The makeover would need to include some way of hiding those holes.

Removing the washer and dryer revealed a patchwork of vinyl flooring, clearly remnants of the sheet vinyl that had been put in the kitchen around 1994. There was obvious water damage to the baseboards, though thankfully none to the subfloor underneath. I removed the baseboards, which had been glued and screwed into place.

After cleaning the walls, I painted them. For a change from the black, grey and purple that fill the rest of my house, I chose a dark aqua/sea blue color.

I installed new flooring. I used the same waterproof, wood-look vinyl plank as in my bathroom.
 
Then commenced my futile quest for studs in the wall. Despite an exhaustive search, I found nary a stud in the upper half of the wall. I think the builder must have hung the drywall sideways, spanning the entire width with one 8’ piece.

With no studs, I’d have to resort to toggle bolts and/or some other type of strong drywall anchors to hang shelves. Many of the previous toggle bolts had pulled halfway through the wall, leaving the shelves hanging rather precariously. I did not want a repeat of that. I decided to build something like a freestanding shelving unit which would have "legs" or side supports down to the floor.

I measured the space and the items I would be storing to determine the size of the shelving unit. The top shelf would be 28" below the ceiling, and the bottom shelf would be 12" below the top shelf. I would have preferred to place the bottom shelf lower, just at the top of the washer and dryer, but the electric outlet and water supply lines were in the way.

I sketched out a plan which would use standard sizes of 1" thick boards (which are actually 3/4" thick, because that is how much sense the American system of measurement makes). I purchased the wood and had it cut to size at my local home improvement store.

To build the shelving unit, I first secured 1” x 8” boards to each side wall. These would be the legs of the shelf and bear much of the weight.


For the top shelf, I placed a 1” x 12” board on top of the legs and secured it with screws down into the legs.

For the bottom shelf, I created supports by screwing short pieces of 1” x 3” to the legs. Then I placed a 1” x 8” on top and secured it with screws.


For additional support, I used a 1” x 4” to create middle legs. Later, I also added a metal shelf support in the middle for the top shelf.

I installed new baseboards around the shelving unit, then painted everything the same color as the walls.


The washer and dryer then returned from their brief vacation in my living room.

Up next... storage and decoration. :)

Saturday, April 9, 2016

Simple DIY Window Trim

Thanks to 40 years of various curtain rods and tiebacks, my bedroom window was surrounded by several holes. They were hidden by the curtains, but I knew they were lurking there. ;)

I decided to add some trim around the window to cover all the holes and make the window look a bit more finished. I used pine 1x4s to create a sort of simplified Craftsman style casing and installed it with my pneumatic nailer.

Because the trim will mostly be covered by curtains, I simply painted it the same color as the walls.


The trim isn't really visible, but it was worth doing as it required only a small investment of money and time. It's certainly better than two dozen holes scattered all around the window. :)

Wednesday, March 30, 2016

Bedside Lamp

I recently purchased a swing arm lamp for $5 at a thrift store.

I revived it with black spray paint and added a new shade. I first tried it with a black shade, which looked great but blocked most of the light from the bulb, making the lamp useless for reading. A white shade is much more practical.

I attached the lamp to the wall and hid the cord in a plastic channel painted to match the wall.

The lamp normally snugs up to the wall, but I can swing it out if needed.