Sunday, June 30, 2013

Bat Hair Clips

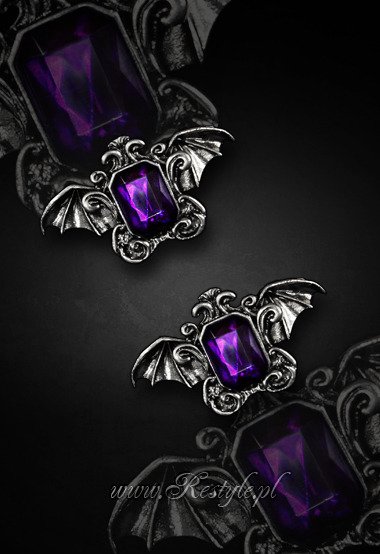
A while back, I ordered a pair of hair clips from Restyle. They are an ornate design with bat wings and purple gems.
from Restyle

I knew they were small, but when they arrived, I was disappointed to see that the actual clip portion on the back was really tiny. They were much too small to be functional in my long, heavy hair, and if I clipped them on just for decoration, they quickly got lost in all the hair.

But now I have shorter hair! Which, by the way, looks like this when blown dry straight:


I can still fit only a small lock of hair in the clips, but the shorter hair is not too heavy for them to hold. Now they can actually be functional and not get completely buried.

They're so cute! The one annoying aspect is that they're both "left-sided" clips, meaning the clip opens on the same side on both. On the Restyle picture, both clips are on the left side of the model's head. But I like to wear one on either side of my head, so the right side clip requires some finagling. :P

Friday, June 28, 2013

Hairstyle Makeover: Bye-Bye, Long Hair

Long hair, I have enjoyed having you... but it was time for you to go.

A fond farewell!

With the weight gone, my hair's natural wave springs up a little. I didn't have any proper styling products on hand; nonetheless, it dried rather wavy with a lot less frizz than I expected. It sure behaves differently in Colorado's dry summer than it did back in Georgia's muggy nightmare.

The cut includes some long layers. The overall length is a couple inches longer than I'd originally had in mind. The stylist wanted to be a little more conservative on the first go, which totally makes sense. She can always cut it shorter and/or add more layers next time.

And there will be a next time with her. She was AWESOME. :D She was super friendly and very tolerant of my nonstop anxiety-induced babbling. Before she even picked up the scissors, she looked closely at the photos I brought in and we discussed my hair care and styling habits. Then she kept up communication during the cut to make sure I was getting what I wanted. She did a great job on the cut. Despite the cowlick I have in front, she got my bangs exactly right. :D

I am glad I got the cut. I've washed it twice since yesterday afternoon just for the novelty of having it dry naturally in less than five hours. :) I really like the option of wearing it wavy. There is just one problem -- I have to learn how to style it!
What is going on with my face here? My left eye isn't THAT much higher than my right.

For today, it's a messy ponytail. Not the height of style, but wow, it's nice to be able to get my hair up off my neck and back with just one little ponytail holder. Especially in the heat of summer!

Now I'm off to the store to find the right styling product for wavy hair. They do make such a thing, right? It's been years since I used anything but heat protection spray...

Wednesday, June 26, 2013

Hairstyle Makeover: Tomorrow is Cut Day

After much deliberation on the idea of changing my hair from black to purple, I decided to stay with black. Purple hair requires money for maintenance, and I'm not expecting to go back to full-time work for another couple of months (more on that another time). I need to be wise about my spending. Dyeing my hair black costs a paltry $3 a month... so black it will be. At least for now.

Though I'm nixing the color change, I'm going ahead with the style change. I decided to go with a roughly shoulder-length style about 15" shorter than my current length. I have an appointment with a hair stylist tomorrow afternoon. I'm a little nervous as I've never seen this stylist before... and, of course, it's not every day that I have 15" of my hair cut off. :-/

Feels like I have a few of these guys in my stomach...

Saturday, June 15, 2013

Giveaway Winners

The winners of the 400 Followers giveaways have been chosen!

The giveaways:

1. ruffle skirt (12 entrants)


2. pixie skirt (15 entrants)


3. tote bag (12 entrants)


4. cherries handbag (13 entrants)


5. damask handbag (30 entrants)


6. pillow cover (32 entrants)


7. tee skirt (12 entrants)


Entrants' names were put into a spreadsheet, one line per entry, and I used a random number generator to choose the winners.

The winners:

1. ruffle skirt -- #13 Sharron

2. pixie skirt -- #39 Britt

3. tote bag -- #28 Jen Conrad

4. cherries handbag -- #20 Fugu

5. damask handbag -- #5 Tenebris In Lux

6. pillow cover -- #32 Insomniac's Attic

7. tee skirt -- #8 theetinygoat


Many thanks to everyone for participating. :)

Winners, please contact me so I can get your mailing address. Congratulations!

Saturday, June 8, 2013

400 Followers, Seven Giveaways

GIY: Goth It Yourself has more than 400 followers! This is an exciting milestone! :D

I am very grateful for all my readers. You make blogging truly rewarding for me. As a thank-you, I will be giving away the projects I made for Sophistique Noir's Red & Black Week. That's a total of seven giveaways!

1. Red and black ruffle skirt made from a dress:
ruffle skirt -- will fit hips up to 42"

2. Red and black panne velvet pixie skirt:
pixie skirt -- will fit hips up to 44"

3. Tote bag made of pirate print and polka-dot cottons:
tote bag

4. Handbag made of cherry print and polka-dot cottons:
cherries handbag

5. Handbag made of black and white damask cotton with red cotton lining
damask handbag

6. Pillow cover made of spooky black velvet over red cotton:
pillow cover -- for 16" x 16" pillow

7. VNV Nation tee skirt:
tee skirt -- will fit hips up to 36"
Please note skirt sizes shown in the captions.

There are Two Ways to Enter. You may do both to receive two entries. Maximum two entries per person.

WAY ONE
  • Follow GIY: Goth It Yourself on Google Friend Connect or Facebook
and
  • Leave a comment on this post indicating which giveaway(s) you want to enter

WAY TWO
  • Post a link to this post on your blog
and
  • Leave a comment on this post including a link to your blog post and indicating which giveaway(s) you want to enter

Entries will be accepted until 10:00 a.m. Mountain Daylight Time on Thursday, June 13, 2013. Winners will be chosen by random drawing and announced on Saturday, June 15, 2013.

One prize per person. If your name is randomly drawn and you have already won a giveaway, a new name will be drawn.

Giveaways are open to all residents of Earth. :)


Again, there will be seven giveaways. Your entry will place your name in all the giveaways you indicated. For example, if you enter via Way One and indicate that you want to enter giveaways 2, 4 and 5, your name will be entered once in giveaway 2, once in giveaway 4 and once in giveaway 5.

Giveaways:
1. ruffle skirt
2. pixie skirt
3. tote bag
4. cherries handbag
5. damask handbag
6. pillow cover
7. tee skirt

Good luck! :D

Friday, June 7, 2013

Red & Black Day 6: Tee Skirts

For day 6 of Red & Black Week, a tutorial on turning a tee shirt into a skirt.

Most of us have a band tee or 10, and often they're not very figure flattering. You can take in the waist, cut off the neckband, and so forth to make a better fitting shirt. Another option is to turn the tee shirt into a tee skirt.

Before you begin, be sure you know your hip measurement. The waistband of the skirt will need to be large enough to fit over your hips.

Grab your tee shirt. For the first example, I had a VNV Nation tee.

I also had a striped tee.

Cut off the neckband and sleeves, leaving as much of the body of the tee as possible. Cut up the sides to separate front from back.

Now you will cut the tee(s) and other fabric (if applicable) into the skirt pieces. The number and shape of the pieces will depend on the style skirt you're going for. You will likely cut triangular shapes with flat tops and possibly rounded bottoms. Wider triangles and more pieces will create fuller skirts.

Important: The total measurement of all the triangle tops must be at least as large as your hip measurement.

For this example, I made a fairly close-fitting A-line skirt. It's made up of four triangular pieces -- front, back and two sides.


Stitch the pieces together.

Measure around the top of the skirt and make a waistband to that measurement. (See the Turn a Dress into a Skirt post if you need instructions on making a waistband.)

Hem/finish the bottom. In this example, I added black lace.

Done!


For the second example, I had an i:Scintilla tee. I planned to make a skirt with this tee, so I bought the largest size (men's XL) to give me plenty of fabric to work with.

Because I had a large tee, I was able to use the bottom half of a dress pattern to cut the fabric. (Tee is folded in half in the picture below.)

I wanted a longer, fuller skirt, so I cut a total of six triangles -- three for the front and three for the back. The middle front and middle back were cut from the front and back of the tee. The other pieces were cut from plain black knit fabric. (Alas, it wasn't quite the same black as the tee. :P )

I sewed on the waistband and added grommet trim.

Done!
Thursday, June 6, 2013

Red & Black Day 5: DIY Pillow Cover

For Day 5 of Red & Black Week, a tutorial on making an "envelope" style pillow cover.

A pillow cover is an excellent first project for the sewing novice. It also provides some of the best ROI (Return on Investment) of any sewing project. Invest a very small amount of fabric and time, and you get a return that can be practically miraculous.

Don't believe you can work miracles with a sewing machine? Let's look at an example. Behold the pillows that came with my sofa:
My eyes! My eyes!

YIKES! I didn't even want the things in my house, much less on display. :P But disguise them inside some simple pillow covers... and wow! Miraculous!

Ready to perform  your own miracle? Here we go!

Begin by determining what size your fabric pieces should be. You will be cutting one piece for the front and two pieces for the back.
Front: about 1-2" larger than the pillow width and 1-2" larger than the pillow length
Back: about 1-2" larger than the pillow width and about 2-3" larger than HALF the pillow length

Did I lose you there? We'll use a 16" x 16" pillow as an example. The fabric should measure as follows:
Front: 17" x 17"
Back: 17" x 11" (Half the pillow length is 8" and 8" + 3" = 11".)

You can measure directly on your fabric if you like. I prefer to make a paper pattern, which is super easy with graph paper.
left pattern piece will be cut on the fold to create the 17" x 17" front

 Cut your fabric. Hem one long end of each back piece.

Place your front piece right side up. In this project, I used a red cotton with a black spooky overlay. (Basting them together is optional.)

Place one back piece on top of the front, right side down, with the hemmed end toward the inside. Line up the top, bottom, and side raw edges.

Place the other back piece in the same manner, lining it up with the other side of the front piece. The hemmed edges of the back pieces should overlap about 3". Pin.

Stitch around all four sides. You can use a regular sewing machine or a serger (overlock machine).

Turn right side out. Sewing is complete!

Insert pillow through the "envelope" opening in the back.

Done! Stand back and admire your miracle. :)